A properly maintained HVAC system ensures comfortable indoor temperatures, reduces energy costs, and extends the life of your equipment. Preparing your HVAC system for year-round efficiency and reliability involves essential maintenance steps, inspections, and adjustments to optimize its performance in every season. This guide outlines actionable steps homeowners can take to maintain their systems effectively.
Dirty or clogged air filters can restrict airflow, forcing your HVAC system to work harder than necessary. This not only increases energy consumption but also decreases the lifespan of your equipment.
- Inspect air filtersmonthly during peak usage periods (summer and winter).
- Replace disposable filters every 1–3 months or according to the manufacturer’s recommendation.
- Wash reusable filters with mild soap and water, ensuring they are completely dry before reinstalling.
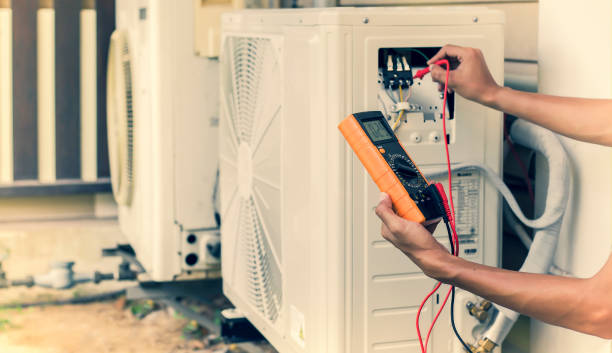
Annual professional maintenance is crucial for identifying potential issues before they escalate into costly repairs or replacements. Consider scheduling service calls during transitional seasons (spring or fall).
- Inspect refrigerant levels and check for leaks.
- Clean evaporator coils, condenser coils, and drain lines.
- Test electrical connections and tighten them as needed.
- Calibrate the thermostat for accurate temperature control.
Regular tune-ups help improve efficiency while ensuring that all components function correctly year-round.
Dust accumulation on registers and vents can obstruct airflow, reducing overall performance.
- Vacuum registers weekly to remove any visible dust or debris.
- Use a damp cloth to wipe down vent covers without pushing dirt deeper into the ducts.
- Avoid blocking vents with furniture or curtains to allow unrestricted airflow.
Proper ventilation reduces strain on the system while maintaining consistent cooling or heating throughout your home.
Leaky or damaged ductwork may result in significant energy losses, reduced efficiency, and uneven distribution of conditioned air across rooms in your home.
| Action | Benefits | Frequency |
| Seal visible leaks with foil tape or mastic sealant. | Prevents energy loss & improves efficiency. | Annually |
| Hire a professional for a full duct inspection. | Identifies hidden issues effectively. | Every 3–5 years |
Properly sealed ductwork ensures smooth delivery of conditioned air throughout the house.
| Season | Temperature While Home | Temperature Away from Home |
| Summer | 78°F (25°C) | 85°F (29°C) |
| Winter | 68°F (20°C) | 60°F (15°C) |
For ultimate convenience and savings:
– Install a programmable thermostat if you don’t already have one. – Use scheduling features based on occupancy patterns.
Well-adjusted thermostat settings reduce overall strain on your HVAC unit.
Taking these proactive measures ensures that your HVAC system runs smoothly while minimizing repair needs over time—leading to increased reliability, comfort, and lower operating costs year-round
Identifying When You Need HVAC Repair San Antonio TX Services Immediately
Amazing Air Solutions – San Antonio AC Repair.
An HVAC system is a vital component in maintaining a comfortable and energy-efficient home. However, like any mechanical system, HVAC units have a lifespan and may eventually need to be replaced. Recognizing the signs of a failing system can save you time, money, and unexpected discomfort. Below are some key indicators that your HVAC system might require immediate replacement.
A well-functioning HVAC system should provide consistent temperature control throughout your home. If you notice uneven heating or cooling, such as hot or cold spots in certain rooms, it could signal a significant issue.
- Failing internal components
- Ductwork leaks
- An aging unit unable to meet demands
While minor issues can often be repaired, persistent performance problems may indicate the need for a replacement.
If you’ve observed a sudden increase in your energy bills without significant changes in usage, your HVAC system may be running inefficiently. Older systems tend to lose efficiency over time due to wear and tear on critical parts like compressors or motors.
| Cause | Impact |
| Dirty filters | Reduced airflow and increased strain |
| Outdated technology | Higher energy consumption compared to newer models |
| Poor maintenance history | Gradual decline in efficiency |
Replacing an outdated unit with an Energy Star-certified model can significantly lower energy consumption and operational costs.
If your HVAC system seems to break down regularly, it might be more cost-effective to replace it rather than continue investing in repairs.
- The repair costs exceed half the value of a new unit.
- Major components such as the compressor or heat exchanger fail.
- Repairs are required every few months.
Frequent repairs not only strain your budget but also suggest that the system is nearing the end of its useful life.
On average, most modern HVAC systems have an expected lifespan of around 10–15 years with proper maintenance. If your unit falls within this range or exceeds it, consider replacing it proactively before experiencing failure.
| Component | Typical Lifespan (Years) |
| Central AC Unit | 10–15 |
| Furnace | 15–20 |
| Heat Pump | 10–15 |
Upgrading an aging system not only enhances reliability but also allows access to modern features like smart thermostats and improved energy efficiency ratings.
Strange sounds such as grinding, banging, or squealing can indicate serious mechanical issues within the HVAC unit. Similarly, odd odors like burning smells may point to electrical problems or overheating parts that could pose safety risks.
- Rattling: Loose parts or debris inside the equipment
- Hissing: Refrigerant leaks
- Buzzing: Electrical issues or failing motors
If these problems persist even after professional troubleshooting, replacement should be considered for safety and performance reasons.
Final Thoughts
Recognizing when your HVAC system requires immediate attention ensures you won’t be caught off guard by sudden breakdowns during critical seasons. By addressing these warning signs early—whether they involve rising costs, inconsistent performance, frequent repairs, or aging equipment—you can maintain comfort while improving energy efficiency over time. Always consult with an experienced HVAC technician when evaluating whether repair or replacement is necessary for your specific circumstances.
How to Tell If You Need Air Conditioning Repair San Antonio TX Immediately
Your HVAC system plays a crucial role in maintaining indoor comfort throughout the year. However, over time, even the most reliable systems will experience wear and tear that may warrant replacement. Recognizing when your HVAC system requires immediate attention can save you money on repairs and prevent unexpected breakdowns. Below are key signs to look for and actionable steps you can take.
A sudden spike in your energy bills, despite consistent usage, could indicate that your HVAC system is no longer operating efficiently. This decrease in efficiency often stems from aging components or systems struggling to meet demand.
- Compare utility bills from previous years for the same season.
- Look for unusual patterns of increased consumption.
- Leaky ductwork.
- Worn-out motors or compressors.
If your HVAC system requires repairs more frequently than usual, it may be nearing the end of its lifespan.
- Repeated issues with airflow or inconsistent temperatures.
- Constant need to replace parts such as capacitors or coils.
| Repair Frequency | Recommendation |
| Once every few years | Likely a minor issue, repair recommended |
| Multiple times per year | Evaluate overall system health; replacement might be cost-effective |
The average lifespan of an HVAC system is approximately 10–15 years with proper maintenance. Systems older than this often struggle to maintain efficiency and reliability.
- Check the unit’s serial number for manufacturing details.
- Consult service records if available.
Recommendation:If your system is nearing or has exceeded this age range, consider upgrading to newer models that offer improved energy efficiency (e. g. , ENERGY STAR-certified systems).
An older or failing HVAC unit may struggle to maintain consistent temperatures throughout your home.
- Failing blower motor or compressor.
- Imbalanced ductwork causing uneven airflow.
Step to Consider:Schedule an inspection of both the unit and ductwork before deciding on a repair or replacement option.
Loud banging, grinding, or squealing noises are not normal and can signal serious mechanical issues within your HVAC unit.
- Banging:Loose parts such as fan blades.
- Grinding:Potential motor failure.
- Squealing:Worn-out belts needing replacement.
Ignoring these sounds could lead to complete system failure at an inconvenient time.
Key Benefits of Replacing Your HVAC Unit
- Improved energy efficiency with modern technology.
- Reduced maintenance and repair costs over time.
- Potential eligibility for energy rebates and tax credits when installing eco-friendly units.
By recognizing early warning signs that indicate immediate replacement needs, you can ensure uninterrupted comfort while reducing unnecessary expenses in repairs and energy consumption. Be proactive about assessing your HVAC system’s condition regularly for long-term reliability and efficiency.
Inspecting and Cleaning Ductwork for Optimal Air Conditioning Performance
Below, we’ll discuss the importance of inspecting and cleaning ductwork and how it contributes to optimal AC performance.
Why Ductwork Maintenance is Crucial
- Improved Airflow: Blocked or dirty ducts restrict airflow, forcing the AC unit to work harder to maintain desired temperatures.
- Better Indoor Air Quality: Dust, allergens, and mold in ductwork can circulate through your home. Regular cleaning ensures cleaner air supply.
- Extended HVAC Lifespan: When the system doesn’t have to compensate for blockages or inefficiencies in the ductwork, it experiences less strain over time.
How to Inspect Ductwork
Routine inspections help identify potential problems before they escalate into costly repairs or replacements.
- Examine any visible sections of the duct system for holes, cracks, or disconnected joints.
- Check vents and registers for accumulated dust or debris.
- Look out for signs of leaks such as streaks of dirt near seams or joints.
- Use an incense stick or smoke pencil near connections; if smoke moves erratically, it may indicate a leak.
- Inspect whether all rooms are receiving consistent airflow.
- Uneven cooling could point toward blockages within specific sections of the duct network.
Steps for Cleaning Ductwork
While some basic cleaning tasks are manageable on your own, professional assistance is often recommended for thorough results.
- Remove vent covers using a screwdriver and clean them with soap and water.
- Use a vacuum cleaner with a long hose attachment to remove loose dirt from accessible areas inside ducts.
- Replace old air filters regularly (every 1-3 months depending on usage).
- Professionals use specialized equipment like high-powered vacuum systems and rotary brushes to clean deep into the ducts.
- They also sanitize surfaces to eliminate bacteria or mold growth.
Signs It’s Time for Professional Help
- Persistent foul odors emanating from vents despite cleaning attempts.
- Excessive dust accumulation shortly after cleaning filters or surfaces.
- Signs of visible mold growth inside vents or around components.
- Unexplained increase in energy bills due to reduced HVAC efficiency.
Proactive Maintenance Schedule
| Task | Frequency | Notes |
| Replace Air Filters | Every 1–3 months | More frequently if you have pets/allergies |
| Visual Inspection | Every 6 months | Look out for visible damage/leaks |
| Professional Duct Cleaning | Every 2–5 years | Varies based on usage/environmental factors |
By making regular duct inspections part of your overall HVAC care plan, you ensure optimum performance while saving money on energy costs in the long run.
The Importance of Checking and Optimizing Your Thermostat for AC Repair Needs
Your thermostat plays a crucial role in maintaining the comfort and efficiency of your HVAC system. Neglecting its maintenance or failing to optimize its settings can lead to increased energy usage, uneven cooling, and unnecessary strain on your air conditioning unit. Ensuring that your thermostat is functioning properly not only improves comfort but also reduces the likelihood of expensive repairs.
Why Your Thermostat Matters in AC Performance
The thermostat acts as the command center for your HVAC system, controlling when and how often your air conditioner operates.
- Inconsistent Temperature Regulation: Rooms may feel too warm or too cold.
- Overworking the AC Unit: Leads to higher energy bills and more frequent repair needs.
- Short Cycling: The system turns on and off too quickly, causing wear and tear.
- Reduced HVAC Lifespan: Continuous strain on the system decreases its overall longevity.
Steps to Check and Optimize Your Thermostat
Regularly inspecting and adjusting your thermostat ensures it operates efficiently.
- Use an indoor thermometer to compare the temperature reading with what’s displayed on your thermostat.
- If there’s a discrepancy, recalibrate or replace the thermostat.
- Set temperatures according to seasonal needs (e. g. , 78°F for cooling in summer).
- Use programmable schedules if available to avoid unnecessary operation when no one is home.
- Ensure the thermostat is located away from direct sunlight or heat-emitting appliances.
- Avoid placing it near drafty windows or doors, as this can cause inaccurate readings.
- For battery-operated models, replace batteries at least once a year or whenever prompted by low-battery warnings.
- Consider switching to a smart thermostat for advanced features like remote control via smartphone apps or automatic learning of temperature preferences.
- Dust accumulation near sensors can affect performance; gently clean them with a soft cloth.
Benefits of Optimizing Your Thermostat
| Benefit | Explanation |
| Lower Energy Bills | Accurate temperature settings prevent overuse of energy resources. |
| Consistent Comfort Levels | Reduces hot spots and uneven cooling throughout your home. |
| Reduced Repairs | Prevents overworking the AC unit due to improper cycling or incorrect settings. |
| Enhanced System Longevity | Minimizes stress on HVAC components over time. |
When to Call a Professional
If DIY checks don’t resolve issues or if you suspect wiring problems within the thermostat device, contact an experienced HVAC technician for assistance. They can diagnose complex issues such as faulty connections or compatibility problems with newer systems.
Optimizing your thermostat is an essential step in maintaining reliable air conditioning performance year-round while keeping repair needs at bay. A well-functioning thermostat ensures that both comfort and efficiency are consistently achieved throughout changing seasons without unnecessary strain on your equipment.
Sealing Air Leaks to Improve Cooling Efficiency and Prevent AC Strain
Air leaks in your home can significantly compromise the performance of your air conditioning (AC) system. Sealing these leaks not only improves cooling efficiency but also prevents unnecessary strain on your HVAC system, potentially extending its lifespan. Below is a comprehensive guide to identifying, sealing, and addressing air leaks for better energy efficiency.
Why Air Leaks Are a Problem
Air leaks allow cooled air to escape from your home, making it harder for your AC to maintain the desired temperature.
- Higher Energy Bills: Your system works longer and harder, consuming more energy.
- Reduced Comfort: Rooms may feel warmer or experience uneven cooling.
- Increased Wear and Tear: Overworking the AC causes components such as compressors and fans to degrade faster.
Identifying Air Leaks
Detecting air leaks is the first step.
- Inspect for gaps around frames.
- Look for drafts or light seeping through closed doors or windows.
- Check where ducts, pipes, or wires enter walls or ceilings.
- Examine insulation for signs of deterioration or gaps.
- Feel for drafts near outlets on exterior walls.
- Ensure dampers close tightly when not in use.
For a more thorough assessment, you may want to hire a professional contractor who can perform a blower door test, which accurately identifies even minor leaks.
How to Seal Air Leaks
- Use silicone-based caulking around window frames and door trims.
- Apply caulking where plumbing or wiring enters walls.
- Install adhesive-backed foam strips along window sashes.
- Add weatherstripping tape around door edges for an airtight seal.
- Sealing DuctworkUse foil-backed duct tape or mastic sealant on joints between duct sections.
- Insulating Larger Gaps For larger openings often found in attics or basements:
- Utilize spray foam insulation.
- Install pre-cut foam boards for irregular-shaped spaces.
Benefits of Sealing Air Leaks
| Benefit | Impact |
| Lower Energy Bills | Reduces wasted energy by maintaining indoor cooling |
| Enhanced Comfort | Eliminates hot spots caused by escaped airflow |
| Reduced HVAC Repairs | Minimizes overuse-related breakdowns |
| Environmental Contribution | Lower energy usage reduces carbon footprint |
By addressing air leaks proactively, homeowners can avoid unnecessary expenses while ensuring their HVAC systems function optimally during peak seasons.
Sealing air leaks is an essential maintenance task that directly impacts cooling efficiency and system reliability year-round. When paired with regular HVAC inspections and cleanings, this simple step ensures better comfort while reducing long-term operational costs.
Clearing the Area Around the Outdoor Unit to Enhance AC Functionality
Maintaining the area surrounding your air conditioning system’s outdoor unit is a crucial step to ensure optimal performance and efficiency. The outdoor unit, also known as the condenser, plays a significant role in heat exchange and cooling operations. Any obstruction or debris in its vicinity can disrupt its functionality, leading to reduced cooling efficiency and potential system damage.
Why Clearing the Area Around the Outdoor Unit is Important
- Ensures Proper Airflow: The outdoor unit needs unobstructed airflow to release heat effectively. Blockages can restrict airflow, forcing your AC system to work harder and consume more energy.
- Reduces Wear and Tear: Debris accumulation increases strain on components like fans and compressors, shortening their lifespan.
- Prevents Overheating: Proper ventilation around the unit helps avoid overheating, which could result in costly repairs or breakdowns.
- Improves Energy Efficiency: With no obstructions hindering performance, your system operates efficiently, reducing energy bills.
Steps to Clear and Maintain the Area Around Your Outdoor Unit
- Clear away leaves, grass clippings, dirt, branches, and other debris from around the unit.
- Use a broom or leaf blower for easier cleanup while avoiding direct impact on delicate components.
- Ensure that plants, shrubs, and trees are at least 2-3 feet away from all sides of the unit.
- Regularly trim back overgrown vegetation to prevent encroachment.
- Remove any overhanging branches or structures that might obstruct airflow or drop debris onto the condenser.
- Make sure that your outdoor unit sits on a flat surface to prevent vibrations or damage to internal parts.
- If necessary, adjust its position on concrete pads or level it out with additional support.
- After storms or high winds, inspect the area for fallen branches or other debris that may have collected near or on top of the unit.
Best Practices for Long-Term Maintenance
| Task | Frequency |
| Remove debris | Weekly or bi-weekly |
| Trim vegetation | Monthly |
| Inspect after storms | After adverse weather |
| Schedule professional maintenance | Annually |
Adopting these practices ensures that your HVAC system operates efficiently throughout its lifespan while minimizing unexpected repair needs.
Additional Tips for Enhancing Performance
- Place a protective cover over your outdoor unit during off-seasons (e. g. , winter) if it won’t be in use.
- Avoid placing decorative elements (like fences) too close to hide it; these could restrict airflow.
- Consider installing a shade structure nearby but not directly above – shading can enhance energy efficiency without compromising ventilation.
Taking proactive steps to maintain clearance around your outdoor AC unit not only boosts its functionality but also protects your investment by reducing wear and extending equipment life.
Clearing the Area Around the Outdoor Unit to Enhance AC Functionality
A well-maintained outdoor unit is crucial for the efficient operation of your air conditioning system. The outdoor unit, also known as the condenser, is responsible for expelling heat from your home and ensuring proper airflow. Neglecting to clear debris or maintain adequate space around it can lead to reduced efficiency, higher energy bills, and even potential breakdowns. Below are actionable steps to ensure your outdoor unit operates at peak performance.
Why Clearing the Area Around Your Outdoor Unit Matters
The outdoor unit needs unrestricted airflow to perform its heat exchange process efficiently. When debris, vegetation, or other obstructions block airflow, the system works harder than necessary. This puts strain on components like the compressor and fan motor, increasing wear and tear while reducing overall cooling performance.
Steps to Clear and Maintain the Area
- Check around your outdoor unit for leaves, grass clippings, dirt, sticks, or any other debris.
- Remove visible debris by hand or with a soft brush.
- Ensure at least 2-3 feet of clearance around all sides of the unit.
- Trim bushes, shrubs, or tree branches that may grow too close.
- Avoid planting tall greenery directly near the condenser.
- Sweep away dust and dirt from surrounding surfaces such as patios or driveways near the unit.
- Consider laying down gravel to reduce dust accumulation.
- If your AC is in a fenced area or enclosed space for aesthetic purposes, ensure that there is adequate ventilation.
- Modify structures if necessary to allow proper airflow.
- Confirm that water drains properly around the condenser base.
- Standing water can not only damage components but also encourage rust or mold growth over time.
Regular Maintenance Schedule
To keep your AC running efficiently year-round: | Task | Frequency | Notes | |————————–|—————–|——————————————-| | Remove loose debris | Weekly/Monthly | Particularly during fall and spring seasons| | Trim surrounding plants | Monthly | Growth can quickly encroach on clearance areas | | Deep clean condenser coils | Twice per year | Best done by an HVAC professional |
Additional Tips for Enhanced Performance
- Avoid Storing Items Nearby:Do not place tools, furniture, or other objects near or on top of your outdoor unit.
- Install a Protective Cover:Use a breathable cover during off-seasons to protect it from falling leaves without trapping moisture inside.
- Schedule Professional Inspections:An annual tune-up by an HVAC technician can ensure everything is operating correctly and identify problems early.
By keeping this area clear and regularly maintained, you not only enhance cooling efficiency but also extend the life of your HVAC system while saving energy costs in the long-term. Proper care ensures that your air conditioning setup stays reliable no matter how hot it gets outside.
- How to Prepare Your HVAC System for Year-Round Efficiency with AC Repair San Antonio TX
- Expert Tips to Try Before Calling for Air Conditioning Repair San Antonio TX
- Understanding Common HVAC Problems and Finding Reliable HVAC Repair San Antonio TX Solutions
- Understanding Your Options for AC Repair San Antonio TX and Central Air Conditioner Systems
- Essential AC Repair San Antonio TX Guide for Optimal Efficiency
- How to Decide the Best Time for AC Repair San Antonio TX and Replacement
- How to Make the Right Choice for AC Repair San Antonio TX


![10 Reasons Your Air Conditioner Leaking Water [Solutions Included] | Austin Area Air Conditioning and Heating | G&S Mechanical](https://images.squarespace-cdn.com/content/v1/5fdbfc63eeb0d96bf9fb0833/493865ef-ecb5-45e2-aa17-8d9d104822e2/Air+Conditioner+Leaking+Water.jpg)
